Chapter 3: Outfit Properties
Every outfit in your Ensemble wardrobe has a set of properties that control how it looks on the dashboard and how it behaves when worn. This chapter covers the full Outfit Properties modal — what each field and option does, and when you would want to change them.
The more advanced dressing options (wear scope, method, base outfits, sequencing, and removal points) are referenced briefly here but covered in detail in Chapters 4, 5, and 6.
3.1 Opening the Properties Modal
The Outfit Properties modal is how you view and edit everything about an outfit. To access this:
- Click the outfit image on any outfit card on the dashboard. The cursor changes to a pointer when you hover over the image to indicate it is clickable.
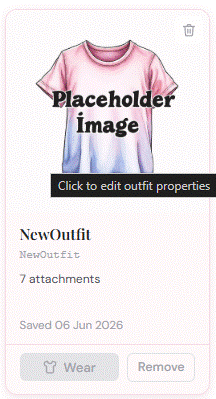
An outfit card with the cursor over the image, showing the pointer cursor that indicates it is clickable
The modal opens over the current page. It is divided into sections: a wear options bar at the top, a lock bar, and then the main fields below. You can scroll within the modal if the content is longer than your screen.
At the bottom of the modal are two buttons: Save to apply your changes, and Discard changes to close without saving. Changes are not applied until you click Save.
3.2 The Wear Options Bar
The wear options bar runs across the top of the modal body and controls two things: how the outfit is worn (its scope and method), and the Wear and Remove buttons for quick access without closing the modal.
The scope and method settings are covered fully in Chapter 4. In brief:
- Scope — “This folder only” wears items from the outfit’s named folder directly; “Folder & subfolders” also wears items from any subfolders inside it.
- Method — “Add” attaches the outfit on top of whatever you are already wearing; “Replace” removes existing items at the relevant attachment points first.
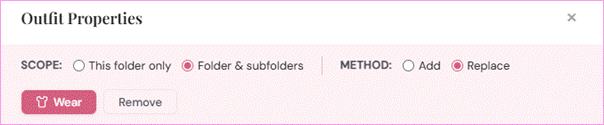
The wear options bar at the top of the Outfit Properties modal, showing the Scope and Method radio buttons and the Wear and Remove buttons
The default for new outfits is “Folder & subfolders” scope with “Replace” method. This is the right choice for most outfits. See Chapter 4 if you need to change it.
3.3 The Lock Bar
Directly below the wear options bar is the lock bar. This shows the current lock state of the outfit and gives you controls to change it.
Locking an outfit
Locking an outfit does two things simultaneously:
- It disables the Wear and Remove buttons for that outfit in the web panel, preventing it from being worn or removed via the web interface.
- It sends an RLV command to your viewer that locks the outfit’s folder, preventing it from being removed by other RLV commands while the lock is in place.

The lock bar showing a locked outfit, with ‘This outfit is locked. Wear and Remove are disabled.’ and the Unlock outfit and Force unlock buttons
To lock an outfit, click Lock outfit in the lock bar. The bar will update to show a locked padlock icon and the message “This outfit is locked. Wear and Remove are disabled.”
To unlock it again, click Unlock outfit. Wear and Remove will be re-enabled.
Note: Locking an outfit from the web panel requires the HUD to be online and RLV to be active. If the HUD is offline when you lock an outfit, the database lock is applied but the in-world RLV restriction will not be set until the HUD next connects.
Force unlock
The Force unlock button appears only when an outfit is locked. It is an emergency option for situations where the normal Unlock button is not working — for example, if the HUD went offline mid-session and the in-world RLV lock was not released.
Force unlock does two things: it clears the lock record in the database, and it attempts to send a release command to the HUD. If the HUD is offline at the time, the database is still cleared immediately, and a note is shown: “HUD was offline — restriction will clear on next relog.”
When to use it: If an outfit is showing as locked but you cannot unlock it normally — for example after a viewer crash, region crossing issue, or HUD replacement — Force unlock is the correct tool. Under normal circumstances you will not need it.
3.4 Title
The Title field contains the display name of the outfit as it appears on the outfit card and in any shared link views. It does not have to match your inventory folder name — you can give the outfit any display name you like.
If you leave the title blank, the outfit card will display the raw RLV folder path instead.
Tip: Titles are also used when searching for outfits in the Base Outfits and Additional Items pickers (covered in Chapter 5), so giving outfits clear, descriptive names makes it easier to build sequences later.
3.5 Path
The Path field shows the RLV folder path that was entered when the outfit was created. This is the path relative to your #RLV folder that Ensemble passes to RLV when wearing the outfit.
Under normal circumstances you will not need to edit this field. It is read-only by default. If you need to correct a path that was entered incorrectly — for example if you renamed the folder in your inventory — click the small edit button next to the path field to unlock it, make your change, and then save.
Warning: Editing the path does not rename the folder in your inventory. If the path and your actual inventory folder do not match, the outfit will fail to wear. Only edit this field if you have already renamed the inventory folder to match, or if you are correcting a typo from when the outfit was first created.
3.6 Image
Each outfit card can display a custom image — typically a screenshot of your avatar wearing the outfit. If no image has been uploaded, the card shows a default placeholder image from the active theme.
Uploading an image
To upload an image for an outfit:
- Open the Outfit Properties modal for that outfit.
- Click the image preview area (or the existing placeholder image). A file picker will open.
- Select an image file from your computer. PNG, JPEG, GIF, and WebP are accepted.
- The image will upload immediately and the preview will update. No need to click Save for the image itself — it uploads on selection.
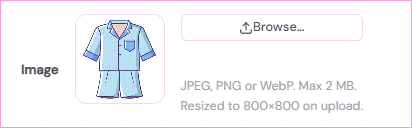
The Outfit Properties modal image section showing an uploaded outfit image in the preview area
Clicking the image preview once it has been uploaded opens it in a full-size lightbox view, which is useful for checking detail.
Image advice: A square crop of your avatar from the waist up works well at the card size. The image is displayed at a fixed aspect ratio on the card, so very wide or very tall images may be cropped. Any standard screenshot tool works fine — there is no required resolution, but 512×512 or similar is a good target.
Replacing or removing an image
To replace an image, simply click the preview area and select a new file. The old image is replaced immediately. There is no separate “remove image”.
3.7 Tags
The Tags field lets you attach one or more labels to an outfit. Tags are used for filtering outfits on the dashboard — clicking a tag in the tag filter bar shows only outfits that share that tag.
Enter tags as a comma-separated list, for example:
Casual, Summer, Mesh, Beach
Tags are case-insensitive when filtering — “Casual” and “casual” are treated as the same tag. Leading and trailing spaces around each tag are trimmed automatically.
Tip: You do not need to be consistent about capitalisation, but it helps to pick a convention and stick to it so the tag filter bar looks tidy. A handful of broad categories (Body, Casual, Formal, Fantasy, etc.) tends to be more useful than many fine-grained tags.
3.8 Comments
The Comments field is a free-text notes area for anything you want to record about an outfit. It is visible to you. Those accessing your Ensemble dashboard via a shared link – cannot open the outfit details where this is displayed.
Typical uses include noting where the items came from, what grid or store they are from, which body size or mesh body they are fitted for, or any special instructions for wearing the outfit.
3.9 Access Level
The Access setting controls whether the outfit appears in shared wardrobe link views. There are two options:
- Public — the outfit is visible in all shared wardrobe views, including those created with “public outfits only” access. This is the default for new outfits.
- Private — the outfit is hidden from standard shared views. It is only visible in shared links that were specifically created with the “include private outfits” option enabled.
The access setting has no effect on your own dashboard view — you always see all outfits regardless of their access level. It only affects what visitors see when they use a shared link.
Example use case: You have a set of everyday outfits you are happy to share publicly, and a few outfits you would rather keep private. Set those to Private and they will be hidden from your default share link, while still appearing on your own dashboard and being available via any link you create with private access enabled.
Shared links and their access options are covered fully in Chapter 7.
3.10 Advanced Dressing Options
Below the Access setting, the properties modal contains several more fields that control the dressing behaviour of the outfit:
- Base Outfits — outfits to wear automatically before this one. Covered in Chapter 5.
- Additional Items — outfits to wear automatically after this one. Covered in Chapter 5.
- Wear After Remove — outfits to wear when this outfit’s Remove button is pressed. Covered in Chapter 5.
- Before Wearing — option to remove specified attachment points before wearing this outfit. Covered in Chapter 6.
These fields are intentionally left brief here because each one has its own chapter. If you are setting up a simple single-outfit wardrobe, you can ignore them entirely for now.
3.11 Saving Changes
When you have finished editing the outfit’s properties, click Save at the bottom of the modal. The changes are sent to the server and the outfit card on the dashboard updates immediately to reflect the new title, image, tags, and access level.
Clicking Discard changes closes the modal without saving.
Note: The image upload is the one exception — images are uploaded immediately on selection, before you click Save. If you upload an image and then click Discard, the image has already been saved to the server even though the other field changes were discarded. To remove an unwanted uploaded image, re-open the modal and upload a replacement.
The next chapter covers Wear Scope and Method — the two settings in the wear options bar at the top of this modal — in full detail.