
Chapter 11: Installing on Nginx
Chapter 11: Installing on nginx
This chapter walks through installing Ensemble on a Linux server running nginx and PHP 8.2-FPM. The instructions are written for Ubuntu 24, which is the platform Ensemble is developed and tested on. Commands for other Debian-based distributions (Debian 12, Ubuntu 22) are identical or very close. For RHEL/CentOS/AlmaLinux, package names differ but the configuration is the same.
By the end of this chapter you will have a working Ensemble installation accessible over HTTPS, with the database and uploads directory kept safely outside the web root.
11.1 Prerequisites
Before starting, make sure you have:
- A Linux server with a public IP address or domain name. A basic VPS with 512 MB RAM is sufficient.
- A domain name pointed at the server’s IP address, with DNS propagated. Certbot needs to be able to reach the server on port 80 to issue a certificate.
- Root or sudo access.
- nginx and PHP 8.2-FPM not yet installed (or already installed — the instructions work either way).
All commands below are run as root or with sudo. The example domain used throughout is ensemble.example.com — replace this with your actual domain everywhere it appears.
11.2 Install nginx and PHP 8.2-FPM
- Update the package list:
sudo apt update
- Install nginx:
sudo apt install -y nginx
- Install PHP 8.2-FPM and the required extensions:
sudo apt install -y php8.2-fpm php8.2-sqlite3 php8.2-gd php8.2-zip
- Confirm that both services are running:
sudo systemctl status nginx sudo systemctl status php8.2-fpm
Both should show active (running). If either is not running, start it:
sudo systemctl start nginx sudo systemctl start php8.2-fpm sudo systemctl enable nginx sudo systemctl enable php8.2-fpm
Note: On Ubuntu 24 the PHP-FPM socket path is /run/php/php8.2-fpm.sock. If you are using a different PHP version, adjust this path throughout the chapter.
11.3 Create the Directory Structure
Create the parent directory and its subdirectories as described in Chapter 10:
sudo mkdir -p /srv/ensemble/www sudo mkdir -p /srv/ensemble/data sudo mkdir -p /srv/ensemble/uploads
Set ownership so that the PHP-FPM process (www-data on Ubuntu) can write to data/ and uploads/, while the web root is owned by your own user for easy file management:
sudo chown -R $USER:$USER /srv/ensemble/www sudo chown -R www-data:www-data /srv/ensemble/data sudo chown -R www-data:www-data /srv/ensemble/uploads sudo chmod 755 /srv/ensemble/data sudo chmod 755 /srv/ensemble/uploads
11.4 Deploy the Ensemble Files
Copy all the Ensemble PHP files and the themes/ directory into /srv/ensemble/www/. The simplest approach is to upload the files via SFTP or SCP from your local machine, or to clone from your source if you have a copy there.
The www/ directory should contain:
index.php api.php auth.php backup.php config.php db.php image.php view.php themes/
Set permissions on the PHP files so they are readable by the web server but not world-writable:
chmod 644 /srv/ensemble/www/*.php find /srv/ensemble/www/themes -type f -exec chmod 644 {} \; find /srv/ensemble/www/themes -type d -exec chmod 755 {} \;
11.5 Configure config.php
Open config.php in a text editor:
nano /srv/ensemble/www/config.php
The default paths in config.php use __DIR__ . ‘/../’ which resolves to /srv/ensemble/ — one level above the web root. With the directory structure in Section 11.3, the defaults are correct and no changes are needed:
define(‘DB_PATH’, __DIR__ . ‘/../data/ensemble.db’); define(‘UPLOADS_DIR’, __DIR__ . ‘/../uploads/’); define(‘LINKS_MAX’, 20); define(‘ACCESS_CODE’, ”);
If you used a different directory layout, update DB_PATH and UPLOADS_DIR to match. Set ACCESS_CODE to a non-empty string if you want to restrict which HUDs can connect (see Chapter 10, Section 10.5).
11.6 Create the nginx Server Block
Create a new nginx configuration file for Ensemble:
sudo nano /etc/nginx/sites-available/ensemble
Paste in the following configuration, replacing ensemble.example.com with your actual domain:
server {
listen 80;
listen [::]:80;
server_name ensemble.example.com;
# Redirect all HTTP to HTTPS once certificate is in place.
# Remove or comment out this block until after Certbot runs.
return 301 https://$host$request_uri;
}
server {
listen 443 ssl;
listen [::]:443 ssl;
server_name ensemble.example.com;
root /srv/ensemble/www;
index index.php;
# SSL certificate — filled in by Certbot
ssl_certificate /etc/letsencrypt/live/ensemble.example.com/fullchain.pem;
ssl_certificate_key /etc/letsencrypt/live/ensemble.example.com/privkey.pem; include /etc/letsencrypt/options-ssl-nginx.conf;
ssl_dhparam /etc/letsencrypt/ssl-dhparams.pem;
# PHP files
location ~ \.php$ {
include snippets/fastcgi-php.conf;
fastcgi_pass unix:/run/php/php8.2-fpm.sock;
fastcgi_param SCRIPT_FILENAME $realpath_root$fastcgi_script_name;
}
# Block direct access to the uploads directory.
# Images are served via image.php which handles auth.
location ^~ /uploads/ {
deny all;
return 403;
}
# Block dot-files and hidden paths
location ~ /\. {
deny all;
}
# Serve static files (theme CSS, images, etc)
location ~* \.(css|js|png|jpg|ico|woff2?)$ {
expires 7d;
add_header Cache-Control “public, immutable”;
}
}
Please note: This is just an example config. It is your responsibility to ensure your config is secure.
First-time setup: If you have not yet run Certbot, comment out the SSL certificate lines and the HTTP-to-HTTPS redirect block, and set the first server block to listen on port 80 only. Get the site loading over HTTP first, then add HTTPS (Section 11.7).
Enable the site by creating a symlink, then test the nginx configuration:
sudo ln -s /etc/nginx/sites-available/ensemble \ /etc/nginx/sites-enabled/ensemble
sudo nginx -t
nginx -t should report syntax is ok and test is successful. If it reports an error, the error message will point you to the problem line. Fix it before proceeding.
Reload nginx to apply the configuration:
sudo systemctl reload nginx
11.7 Obtain an SSL Certificate with Certbot
- Install Certbot and the nginx plugin:
sudo apt install -y certbot python3-certbot-nginx
- Run Certbot for your domain. It will detect the nginx configuration automatically and offer to configure HTTPS and the HTTP redirect:
sudo certbot –nginx -d ensemble.example.com
- Follow the prompts. When asked whether to redirect HTTP to HTTPS, choose Redirect (option 2).
- Certbot will update your nginx configuration with the certificate paths and reload nginx automatically.
- Verify automatic renewal is active:
sudo certbot renew –dry-run
If the dry-run succeeds, your certificate will renew automatically before expiry via the systemd timer that Certbot installs. No manual renewal is required.
11.8 First Boot and Verification
Open your domain in a browser: https://ensemble.example.com. You should see the Ensemble login page. This confirms nginx is serving PHP correctly.
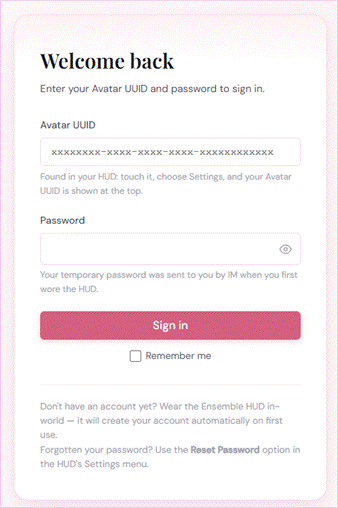
The Ensemble login page loading correctly over HTTPS in a browser, showing the Avatar UUID and Password fields
The database is created automatically on the first PHP request. Check that the database file has been created:
ls -la /srv/ensemble/data/
You should see ensemble.db (and ensemble.db-wal, ensemble.db-shm once a write has occurred — these are normal SQLite WAL mode working files).
Now wear the HUD in-world, enter your web panel URL in the HUD’s Settings › Set Web URL, and follow the first-boot flow from Chapter 2.
11.9 PHP-FPM Pool Configuration
The default PHP-FPM pool configuration works fine for a small personal or community installation. For reference, the pool configuration file is at:
/etc/php/8.2/fpm/pool.d/www.conf
Two settings worth knowing about for Ensemble:
- `upload_max_filesize` and `post_max_size` — these control the maximum size of uploaded outfit images and backup files. Outfit images are resized and recompressed to JPEG on upload, so a few megabytes is sufficient. Backup files can be larger if you have many outfit images. The defaults (2 MB and 8 MB) are usually adequate; increase them in /etc/php/8.2/fpm/php.ini if users report upload failures for large backups.
- `pm.max_children` — the number of PHP-FPM worker processes. The default (pm = dynamic, pm.max_children = 5) is fine for a small installation. Increase it if you are running a heavily used shared instance.
After any change to php.ini or pool.d/www.conf, restart PHP-FPM:
sudo systemctl restart php8.2-fpm
11.10 Common Issues
502 Bad Gateway
nginx received no response from PHP-FPM. This is almost always one of two things:
- PHP-FPM is not running. Check with sudo systemctl status php8.2-fpm. Start it if it has stopped.
- Wrong socket path. The FastCGI socket path in the nginx configuration must match the actual socket. Check what socket PHP-FPM is using with ls /run/php/ and update fastcgi_pass in the nginx config to match.
After fixing, reload nginx: sudo systemctl reload nginx.
403 Forbidden
nginx is refusing to serve the files. The most common cause is incorrect directory permissions. The PHP-FPM process (www-data) needs execute permission on each directory in the path to the files. Check:
ls -la /srv/ensemble/ ls -la /srv/ensemble/www/
Directories need 755 permission; PHP files need 644. If www-data cannot read the directory, nginx returns 403. Fix with:
sudo chmod 755 /srv/ sudo chmod 755 /srv/ensemble/ sudo chmod 755 /srv/ensemble/www/ sudo chmod 644 /srv/ensemble/www/*.php
Blank page / PHP not executing
If the browser displays a blank page or the raw PHP source code, PHP is not being executed. Confirm:
- The location ~ \.php$ block exists in the nginx configuration.
- The fastcgi_pass socket path is correct.
- PHP-FPM is running.
To see PHP errors during troubleshooting, temporarily enable error display in /etc/php/8.2/fpm/php.ini:
display_errors = On error_reporting = E_ALL
Restart PHP-FPM after changing php.ini. Remove these lines or set them back to Off / E_NONE before putting the site into production.
Log files: nginx error logs are at /var/log/nginx/error.log. PHP-FPM logs are at /var/log/php8.2-fpm.log. These are the first places to look when something is not working as expected.
Database permission error
If the web panel loads but shows a database error (or the login page appears but login fails immediately), the PHP process cannot write to the data/ directory. Confirm ownership:
ls -la /srv/ensemble/ # data/ should show owner www-data sudo chown -R www-data:www-data /srv/ensemble/data/
HUD cannot connect
If the HUD reports that it cannot reach the web panel, check:
- Your domain resolves to the correct IP: nslookup ensemble.example.com.
- Port 443 is open in your server’s firewall: sudo ufw status or check your hosting provider’s firewall rules.
- The SSL certificate is valid: visit the URL in a browser and check for any certificate warnings.
- The URL you entered in the HUD matches exactly what is in the browser address bar, including https:// and no trailing slash.
The next chapter covers the same installation process for Apache, which is the right choice if you are on shared hosting or already running an Apache server.