
Chapter 2: Setting Up for the First Time
This chapter takes you through everything you need to do before you can wear your first outfit with Ensemble. By the end you will have the HUD on your avatar, an account on the web panel, and a working outfit ready to wear.
If you have not yet read Chapter 1 and are unfamiliar with what the HUD and web panel are, it is worth reading that first.
2.1 Prerequisites
Before you start, make sure you have the following three things in place:
- An RLV-capable viewer with RLV enabled. Firestorm is recommended. RLV must be switched on in your viewer settings — it is off by default. Section 2.2 explains how to do this.
- A #RLV folder in your inventory. This is a top-level folder that your viewer’s RLV layer uses to find wearable items. Section 2.3 explains what it is and how to create it if you do not have one already.
- A copy of the Ensemble HUD. This is available from the OpenSimWorld Script Library (https://opensimworld.com/library?view=167). If you received it from a store or another user, that is fine too — the HUD is full-permission and freely distributable.
You do not need your own web server. The hosted instance at https://ensemble.virtualportal.space is available to all users at no cost. If you want to run your own installation, see Part 3 of this manual.
2.2 Enabling RLV in Firestorm
RLV is disabled by default in Firestorm and must be turned on once before Ensemble can wear or remove outfits. You only need to do this once; the setting persists across sessions.
To enable RLV in Firestorm:
- Open the Preferences window. You can find this under Avatar → Preferences, or press Ctrl + P.
- Go to the Firestorm tab.
- Tick the box labelled Allow Remote Scripted Viewer Controls (RLVa).
- Click OK to save.
- Restart your viewer. RLV does not take effect until the viewer has been restarted.
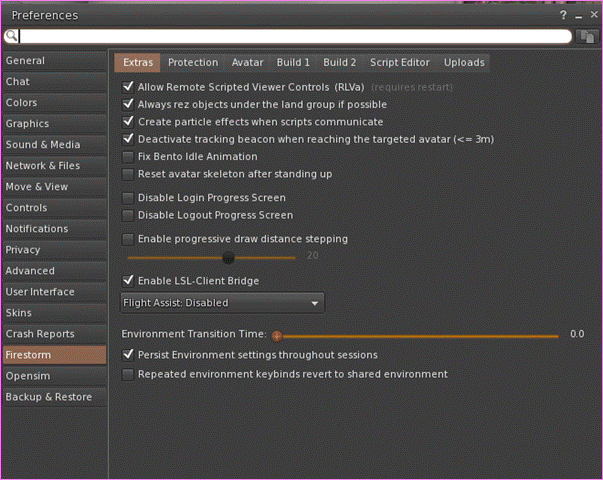
Firestorm Preferences → Firestorm tab, showing the RLVa checkbox ticked]
Note: If you are using a viewer other than Firestorm, look for an equivalent RLV or “Restraining Love” option in your viewer’s preferences. The exact location varies by viewer.
2.3 The #RLV Folder
RLV works by attaching items from named folders inside a special top-level inventory folder called #RLV. The hash symbol at the start is part of the name — it must be spelled exactly as shown, including the capital letters.
When Ensemble tells the viewer to wear an outfit, it passes the name of the outfit folder to RLV. The viewer then looks for that folder inside #RLV and attaches everything in it. If the #RLV folder does not exist, or if the outfit folder is not inside it, nothing will be worn.
Creating the #RLV folder
If you do not already have a #RLV folder, create one now:
- Open your inventory.
- Right-click the top-level Inventory folder and choose New Folder.
- Name the new folder exactly #RLV — capital R, capital L, capital V, with a hash symbol at the start.
Important: The #RLV folder must be at the very top level of your inventory, not inside any other folder. If you accidentally create it inside another folder, RLV will not find it.
Once the folder exists you can start placing outfit folders inside it. Section 2.7 covers how to set up your first outfit folder.
2.4 Wearing the HUD for the First Time
With RLV enabled and the #RLV folder in place, you are ready to wear the Ensemble HUD.
Find the HUD in your inventory and wear it. It will attach to your avatar. On first wear — or the first time it runs for a new owner — the HUD initialises itself and registers your avatar with the web panel.
Within a few seconds you will receive an instant message from the HUD. It will look something like this:
[Ensemble] Your temporary password is: a7f3k9 Go to https://ensemble.virtualportal.space and log in with your Avatar UUID and this password. You will be asked to set a new password immediately. ⚠ This password is only valid for this session. If you relog or reattach the HUD before logging in, a new one will be generated.
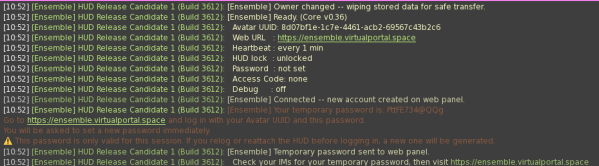
The message contains two things you need:
- The temporary password — a short code you will use to log in for the first time.
- The web panel URL — the address of the Ensemble web panel. If you are using the hosted instance this will be https://ensemble.virtualportal.space.
Important: The temporary password is only valid for your current session. If you relog, reattach the HUD, or cross to a different region before you have logged in and set a permanent password, a new temporary password will be generated, and the old one will stop working. If this happens, use the most recent temporary password you have been sent, or open the HUD’s Settings menu and tap New Passwd to request a fresh one.
Make a note of the temporary password, then move on to Section 2.5.
2.5 Logging In to the Web Panel
Open a web browser and go to the URL shown in the instant message (or to your own installation if you are self-hosting).
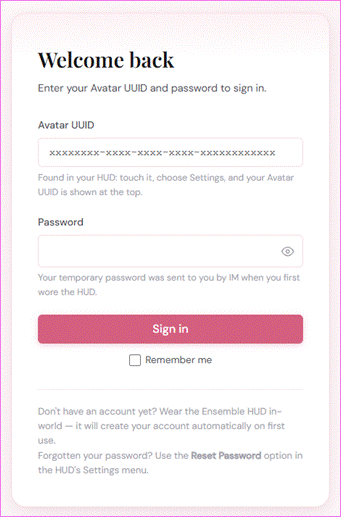
The Ensemble login page with Avatar UUID and password fields
You will see a login form with two fields:
- Avatar UUID — your avatar’s unique identifier. You can find this in Firestorm under Avatar → Avatar Profile → My Profile, or by opening the HUD’s main menu (touch the HUD) — the UUID is shown in the menu header. Copy and paste it into the login field.
- Password — enter the temporary password from the instant message.
Click Log In. Because you are using a temporary password, the web panel will immediately ask you to set a permanent one. Choose a password you will remember and enter it twice to confirm. Your temporary password will no longer work after this point.
Tip: You can use your browser’s password manager to save your credentials. The Avatar UUID field accepts a saved username. Additionally, if you check the box “Remember me” on the login page – you will not need to log in again until you log out by using the “log out” option, or use a different browser.
2.6 The Dashboard
After setting your password you will land on the Ensemble dashboard — the main screen of the web panel.
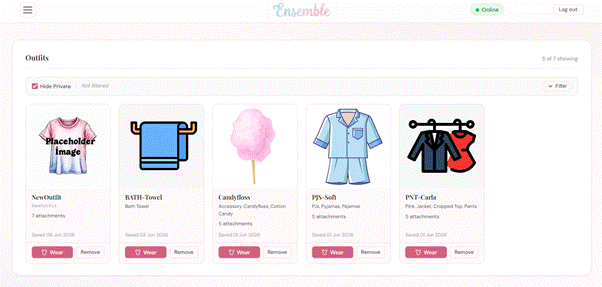
The Ensemble dashboard showing outfit cards and the hamburger menu button
The dashboard has three main areas:
- The header bar — runs across the top of the page. On the left is the hamburger menu button (three horizontal lines), which opens the side navigation menu. In the middle is the Ensemble logo. On the right is a status badge showing whether your HUD is currently connected: Online (checked in recently), Stale (last check-in was a few minutes ago), or Offline (not seen for a while or not yet worn). Next to the status badge is the name of the currently logged in user, and the log out button.
- The outfit grid — the main area of the page, showing your outfit cards. Each card displays the outfit’s name, image, and Wear / Remove buttons. This will be empty until you create your first outfit.
- The side menu — opened by clicking the hamburger button. This is where all other functions live: Outfits, Tools, Backup, and Settings.
Chapter 8 covers the Settings menu in full. For now, you have everything you need to continue.
2.7 The In-World HUD Menu
Touching the HUD in-world opens the main menu. It shows a summary of your current HUD state and four buttons:
- Create Outfit — opens a text box where you can register a new outfit. Covered in Section 2.8.
- Website — opens a prompt to load the web panel URL in your browser directly from the viewer.
- Lock / Unlock — toggles the HUD lock. When locked, the HUD itself cannot be removed by RLV commands, and a lock icon is shown. See Chapter 3 for more on outfit locking.
- Settings — opens the Settings submenu, which lets you configure the web URL, heartbeat frequency, password, access code, and debug mode. Under normal circumstances you will not need to visit this menu after initial setup.
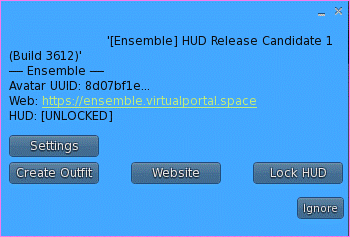
The in-world HUD main menu showing the four buttons
The Settings submenu is covered in full in Chapter 8. The one item worth knowing about now is New Passwd (or Set Passwd if no password has been set yet) — use this if you ever need to generate a fresh temporary password, for example if you received a new HUD or changed your web URL.
2.8 Creating Your First Outfit
Before you can wear an outfit with Ensemble, you need to:
- Set up the outfit folder in your #RLV inventory.
- Register it with Ensemble using the Create Outfit button on the HUD.
Step 1: Set up the outfit folder
In your inventory, navigate to the #RLV folder. Create a new subfolder inside it and name it after your outfit. A recommended convention is to keep all your Ensemble outfit folders inside a dedicated subfolder, for example:
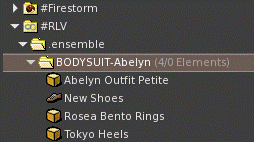
Possible Suggested Folder Layout
The .ensemble subfolder is just a naming convention — it keeps your Ensemble outfits tidy and out of the way. You can use any folder structure you like, as long as the outfit folder is somewhere inside #RLV.
Naming advice: Use underscores or hyphens instead of spaces in folder names. Spaces in RLV folder names can cause the viewer to match only the first word, which may result in the wrong outfit being worn or nothing being worn at all. For example, use BODYSUITAbelyn or BODYSUIT-Abelyn, not BODYSUIT Abelyn.
Now put the items you want to wear into the outfit folder. For this first outfit, place all items directly in the folder — not in any subfolders. This is the simplest case. Ensemble also supports wearing items from subfolders, which is covered in Chapter 4.
Step 2: Register the outfit with Ensemble
Once the folder is set up, touch the HUD and choose Create Outfit. A text box will appear asking for the RLV path to your outfit folder.
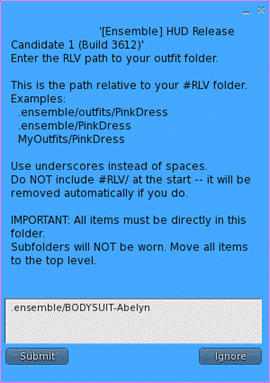
The Create Outfit text box showing the path entry field with example
Enter the path to your outfit folder relative to #RLV — do not include #RLV/ at the start. Using the example above, the path would be:
.ensemble/BODYSUIT-Abelyn
Press Enter (or the submit button in your viewer) to submit the path. The HUD will register the outfit with the web panel, and within a moment a new outfit card will appear on your dashboard.
Note: If the HUD warns you that a path “contains spaces”, rename the inventory folder using underscores and create the outfit again. The old entry can be deleted from the web panel.
2.9 Wearing and Removing an Outfit
With your first outfit registered, go to the web panel in your browser. You will see the outfit card on the dashboard.
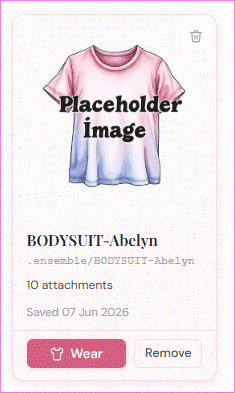
An outfit card showing the Wear and Remove buttons
Each outfit card has two action buttons:
- Wear — sends an instruction to the HUD to attach the outfit’s items via RLV.
- Remove — sends an instruction to the HUD to detach the outfit’s items.
Click Wear. The HUD will receive the command and issue the appropriate RLV instruction to your viewer. The items in the outfit folder will attach to your avatar over the next few seconds.
Click Remove to take the outfit off again. The items will be detached.
Tip: The Wear and Remove buttons are also accessible from a shared link you create and grant “Wear” permissions, allowing someone else to dress or undress your avatar remotely. Shared links are covered in Chapter 7.
2.10 HUD Status: Online, Stale, and Offline
The status badge in the header bar tells you whether the web panel can currently reach your HUD. There are three states:
- Online — the HUD has checked in within the last couple of minutes. Commands sent from the web panel will reach your avatar promptly.
- Stale — the HUD checked in a few minutes ago but has not been heard from since. This is normal during region crossings or brief connectivity interruptions. Commands will be delivered the next time the HUD checks in.
- Offline — the HUD has not been heard from for an extended period, or has never connected. This means your avatar is logged out, the HUD has been removed, or there is a connection problem.
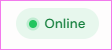
The status badge in the header bar showing Online, Stale, and Offline states
The HUD checks in with the web panel on a regular heartbeat — by default every minute. You can adjust this in the HUD’s Settings menu using the Heartbeat option.
Region crossings
When you cross to a new region in-world, the HUD briefly loses its connection to the web panel and then re-establishes it automatically. During the crossing the status may briefly show as Stale. This is expected behaviour; no action is needed.
Logging out
When you log out of your viewer the HUD stops sending heartbeats. The status will transition from Online to Stale and eventually to Offline as the web panel stops receiving check-ins. When you log back in and the HUD re-attaches (or you wear it again), it will reconnect and the status will return to Online within a minute.
Hypergrid travel
If you travel to another grid via the Hypergrid, the HUD will go silent for the duration of that visit. This is normal — the HUD cannot communicate across grids. When you return to your home grid the HUD will reconnect automatically on the next heartbeat cycle. If is possible to restart the HUD on a foreign grid if scripts are allowed, the web panel will then show online again. However, it as most grids rename folders in inventory by appending (unavailable) during hypergrid visits – the system will not be able to find your outfit folders.
You are now set up and ready to use Ensemble. The following chapters cover the full range of outfit options, from wear modes and outfit sequences to sharing links and backup. Chapter 3 is a good next step if you want to add an image to your outfit card or explore the other outfit properties.