Chapter 6: Remove Before Wearing
When you wear an outfit in RLV using Replace mode (Chapter 4), RLV replaces existing items at the same attachment points as the new outfit’s items. This works well when the new outfit covers all the same points as what you were wearing before. But in practice, outfits often leave stray items behind — accessories, jewellery, or body parts that occupy points the new outfit does not touch.
The Remove Before Wearing feature solves this by telling the HUD to explicitly clear a set of attachment points before attaching the new outfit. You define which points to clear, either globally as your defaults or per-outfit as a custom list. The HUD then issues an @remattach command for each point before sending the wear command.
This chapter covers how to enable and configure Remove Before Wearing for an outfit, how to set your account-wide default removal points, and how the fallback logic works.
6.1 Why Remove Before Wearing?
Consider this common scenario: you are wearing a full outfit that includes earrings at the Left Ear and Right Ear attachment points. You switch to a new outfit that has no earrings — so RLV’s Replace mode has no reason to remove anything at the ear points. The earrings stay on, even though the rest of the outfit has changed.
Remove Before Wearing addresses this by giving you a list of attachment points to always clear before wearing a particular outfit. You define the list once, and every subsequent Wear for that outfit starts with a clean slate at those points.
Note: Remove Before Wearing is separate from the outfit’s Method (Replace/Add). It runs first, before the wear command itself, regardless of whether the method is Replace or Add. Even an Add-mode outfit can use Remove Before Wearing to clear specific points first.
6.2 Enabling Remove Before Wearing
Remove Before Wearing is configured in the Outfit Properties modal, in the Before Wearing row.
- Open the Outfit Properties modal for the outfit.
- Find the Before Wearing row near the bottom of the modal.
- Tick the Remove attachment points before wearing checkbox. A scope section will appear below the checkbox.
- Choose which set of points to use (see Section 6.3).
- Click Save.
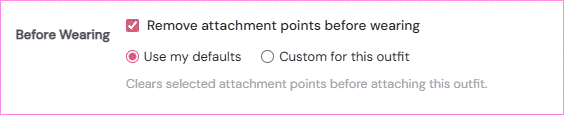
The Before Wearing row in the Outfit Properties modal, showing the checkbox ticked and the scope radio buttons visible below it
Once enabled, the next time you click Wear for this outfit, the HUD will send an @remattach command for each point in the list before attaching the outfit’s items. A short half-second pause follows the removals before the wear command is issued, to give RLV time to process the detachments.
6.3 Choosing Which Points to Clear
When Remove Before Wearing is enabled, you choose one of two scopes in the radio buttons that appear:
- Use my defaults — the account-wide default removal points list is used. This list is configured in Account Settings → Default Removal Points and applies to every outfit that is set to “Use my defaults”.
- Custom for this outfit — a point checklist appears, and you can tick or untick individual attachment points for this outfit specifically. The selection is saved with the outfit and overrides your defaults entirely.
The two options are mutually exclusive. An outfit uses either the defaults or its own custom list — never a combination of both.
The fallback chain
When Ensemble resolves which points to clear for a given wear action, it follows this three-tier fallback:
| Custom points for this outfit | User defaults (Account Settings) | System defaults (47 body points) |
- If the outfit has Custom points saved, those are used.
- Otherwise, if you have set user defaults in Account Settings, those are used.
- Otherwise, the system defaults are used — a built-in list of 47 body attachment points covering head, torso, arms, and legs (see Section 6.5).
This means that if you tick “Use my defaults” and have never configured your defaults, the system defaults will be applied — which is a safe and broad set for most purposes.
6.4 Setting Your Default Removal Points
Your default removal points are the list applied to any outfit that has Remove Before Wearing enabled and is set to “Use my defaults”. You configure them once and they apply across your whole wardrobe.
To set your defaults:
- Click the hamburger menu (≡) in the top-right of the web panel to open the side navigation.
- Go to Settings → Default Removal Points.
- A checklist of all avatar attachment points appears, grouped by body region. Tick every point you want cleared before wearing.
- Click Save defaults.
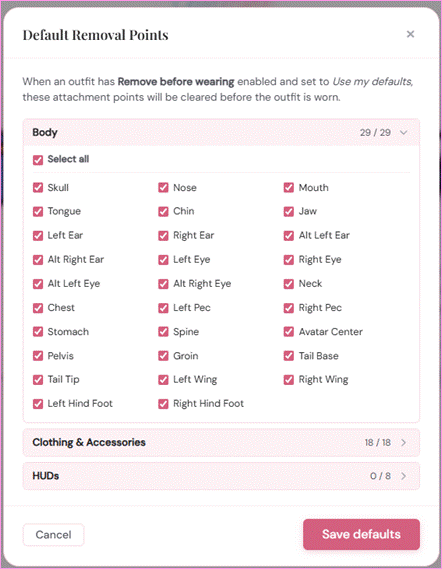
The Default Removal Points modal in Account Settings, showing a checklist of attachment points grouped by body region with several ticked
The checklist is grouped into body regions for convenience. You can tick or untick entire groups or individual points. The list covers all standard avatar attachment points; HUD positions are listed separately and are not included in the system defaults (see Section 6.5).
Tip: A broad default list — ticking most body points — is usually the right approach. The goal is to clear anything that might be left over from a previous outfit. If you find that a particular accessory is always being removed when it should not be, either untick its point from the defaults or switch the relevant outfit to “Custom for this outfit” and leave that point unticked there.
6.5 The System Default Points
If you have not configured any user defaults, Ensemble falls back to the system defaults — a built-in list of attachment points covering the full avatar body. The table below shows which points are included.
| Category | Attachment points (included in system defaults) |
| Head & face | Skull, Nose, Mouth, Tongue, Chin, Jaw, Left Ear, Right Ear, Alt Left Ear, Alt Right Ear, Left Eye, Right Eye, Alt Left Eye, Alt Right Eye |
| Torso | Neck, Chest, Left Pec, Right Pec, Stomach, Spine, Avatar Center, Pelvis, Groin |
| Tail & wings | Tail Base, Tail Tip, Left Wing, Right Wing, Left Hind Foot, Right Hind Foot |
| Arms & hands | Left Shoulder, Right Shoulder, L Upper Arm, R Upper Arm, L Lower Arm, R Lower Arm, Left Hand, Right Hand, Left Ring Finger, Right Ring Finger |
| Legs & feet | Left Hip, Right Hip, L Upper Leg, R Upper Leg, R Lower Leg, L Lower Leg, Left Foot, Right Foot |
| HUD positions | Not included in system defaults. HUD points must be added manually in the Default Removal Points – or via custom removal in outfits themselves. |
HUD attachment points (positions 31 through 38, which correspond to HUD Top Left, HUD Top, HUD Top Right, and so on) are intentionally excluded from the system defaults initially. This is because HUDs are often persistent objects that you want to keep across outfit changes — Ensemble itself is a HUD and must not remove itself. If you need to clear a HUD point for a specific outfit, add it via Custom points for that outfit.
Note: The system defaults list is fixed and cannot be changed. It exists only as a final fallback. Your user defaults, once set, replace it entirely.
6.6 Custom Points for an Outfit
If an outfit’s removal needs differ from your defaults — for example, a shoes outfit that should only clear the Left Foot and Right Foot points — set it to “Custom for this outfit” and configure the point list in the Outfit Properties modal.
When you select “Custom for this outfit”, the same attachment point checklist appears directly in the modal, below the radio buttons. Tick the points you want cleared for this outfit specifically. The selection is saved with the outfit when you click Save.
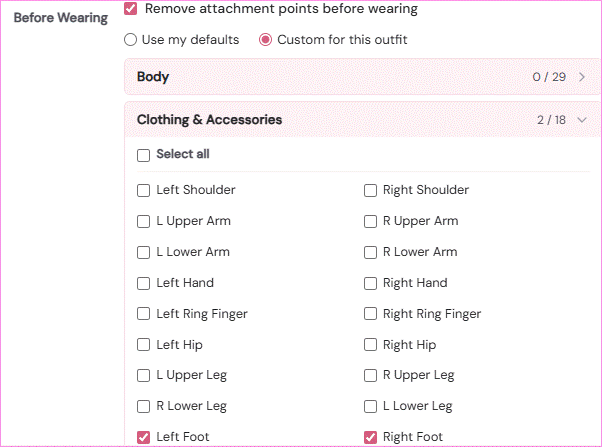
The Outfit Properties modal with ‘Custom for this outfit’ selected and the attachment point checklist showing Left Foot and Right Foot ticked
Custom points give you precise control. Typical uses:
- Shoes outfit — custom points: Left Foot, Right Foot only. No other points are touched.
- Hair outfit — custom points: Skull only. Clears the head attachment before wearing the new hair without disturbing earrings or face attachments.
- Full reset outfit — custom points: all body points ticked. Used as the first step in a base outfit sequence to clear everything before starting fresh.
- Accessory outfit — custom points: the specific point(s) used by the accessory. Ensures the slot is free before attaching.
6.7 How the HUD Applies Removal
When the HUD receives a wear command that includes a removal points list, it processes the removals as follows:
- For each attachment point integer in the list, the HUD looks up the human-readable RLV name for that point (for example, integer 7 maps to “Left Foot”).
- For HUD attachment points (integers 31–38), the HUD strips the “HUD ” prefix from the name before passing it to RLV, because RLV’s @remattach command expects the short form for HUD positions.
- The HUD issues @remattach:<point name>=force for each point in turn.
- After all removals are sent, the HUD sleeps for 0.5 seconds to give RLV time to process the detachments.
- The wear command is then sent.
The removals happen in sequence, one @remattach call per point. There is no batching. For a long removal list this takes a perceptible fraction of a second, but is fast enough to be invisible in practice.
Technical note: The @remattach command detaches whatever is currently at the named point, regardless of what it is or where it came from. It is not specific to Ensemble — it will remove anything at that point, including items worn manually from inventory. Use a targeted custom list if you want to avoid disrupting non-Ensemble items.
6.8 Remove Before Wearing in Sequences
When Remove Before Wearing is applied as part of a longer sequence (Chapter 5), each step’s removal points are resolved and applied independently, immediately before that step’s wear command:
- A base outfit with Remove Before Wearing enabled will clear its points before it is worn, at the start of the sequence.
- The main outfit’s removal points are applied before the main outfit is worn.
- Each additional item’s removal points are applied before that item is worn.
This means that if a base outfit clears a point, and then the main outfit also has that point in its removal list, the point will be cleared twice — which is harmless but redundant. There is no de-duplication across sequence steps.
In practice, the most efficient configuration is to put broad removal only on the base or main outfit, and use targeted custom lists on additional items. This avoids redundant clearing while still guaranteeing a clean slate where it matters.
The next chapter covers Sharing Outfits with Links — how to give others access to your wardrobe so they can view or wear your outfits remotely.