
Chapter 9: Backup, Restore, and RLV Tools
This chapter covers two sets of features available from the side navigation menu: the Backup and Restore tools, which let you export your wardrobe and import it again; and the RLV Tools, which give you a direct view of what is currently attached to your avatar and a way to send RLV commands from the web panel.
9.1 Backup
The backup feature exports your entire wardrobe to a single downloadable file. This is the recommended way to safeguard your Ensemble data before making major changes — such as a large reorganisation — and is the only supported method for migrating your wardrobe to a different Ensemble installation.
What is included in a backup
A backup file is a .zip archive containing:
- `ensemble_backup.json` — a structured export of all your data: outfit records (names, paths, settings, tags, comments, all dressing configuration), shared links, and your account metadata. The JSON uses format version 1.
- `uploads/<uuid>/` — a folder containing all your outfit images, one file per outfit that has an image set.
The backup file name includes your username and a timestamp, for example:
ensemble_backup_YourName_20260601_143022.zip
What is not included
Your account credentials (password hash), HUD connection state (simulator URL, last seen time), and server-side configuration are not included in the backup. This is intentional: restoring a backup does not disrupt your HUD’s active connection or require you to log in again.
Downloading a backup
- Click the hamburger menu (≡) to open the side navigation.
- Go to Backup › Download Backup.
- The backup is generated immediately and your browser will download the .zip file.
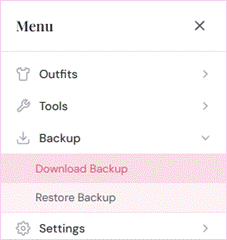
The side menu open with Backup expanded, showing Download Backup and Restore Backup items
The download is generated on demand — it always reflects the current state of your wardrobe at the moment you click. There is no scheduled or automatic backup; you need to download one manually when you want one.
Recommendation: Download a backup before any significant change to your wardrobe — before a bulk delete, before a restore, or before migrating to a new installation. Store it somewhere safe outside the web panel.
9.2 Restore
The restore feature imports a previously downloaded backup file and replaces your current wardrobe with its contents. It is a complete replacement — your existing outfits and links are deleted before the backup is applied.
Warning: A restore is destructive. Your current outfits, links, and outfit images are permanently deleted before the backup data is applied. Download a backup of your current data before restoring if you might want to recover it later.
Restoring a backup
- Click the hamburger menu (≡) to open the side navigation.
- Go to Backup › Restore Backup.
- A file picker appears. Select your .zip backup file.
- If the backup was made on the same account, the restore proceeds immediately.
- If the backup was made on a different account (different avatar UUID), a warning is shown first. You must confirm before the restore proceeds.
- When complete, a summary is shown: the number of outfits restored, links restored, and images restored.
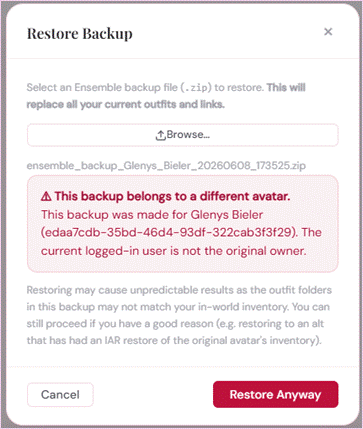
The restore confirmation dialog showing ‘This backup was created by a different avatar’ with a Confirm and Cancel button
What happens during a restore
The restore process works in this order:
- All existing outfits for your account are deleted from the database.
- All existing shared links for your account are deleted.
- Outfits from the backup are inserted in their original creation order.
- Cross-outfit references (base outfits, additional items, wear after remove) are remapped to the new database IDs. References to outfits that were not in the backup are silently dropped.
- Shared links are inserted with fresh randomly-generated UUIDs — see below.
- Outfit images from the backup are written to your uploads folder. Your existing images are deleted first.
Your account credentials, HUD connection settings, and default removal points are not touched. The restore affects only outfits, links, and images.
Lock state after restore
All restored outfits have their lock state reset to unlocked, regardless of whether they were locked in the backup. This prevents a situation where outfits are restored in a locked state that cannot be cleared because the HUD is offline.
Shared links after restore
Shared links are restored with the same settings (label, scope, permissions) as in the backup, but with new randomly-generated link UUIDs. Any previously shared URLs will stop working after a restore — even a same-user restore on the same installation.
This is intentional: if a backup has been shared with others or stored somewhere, regenerating UUIDs ensures old links cannot accidentally be used after a restore. After restoring, share new link URLs with anyone who needs them.
Cross-user restore
A backup from one avatar can be restored to a different avatar’s account. This is useful for migrating a wardrobe from one avatar to another, or from one grid account to another. When you restore a backup that has a different avatar UUID than your current account, Ensemble shows a warning and asks you to confirm before proceeding.
After a cross-user restore, the wardrobe data belongs to your current account. The backup’s original UUID is not stored anywhere; your HUD and login credentials continue to work normally.
Note: The outfit folder paths stored in the backup (the RLV paths under #RLV) are restored as-is. If you are migrating to a different avatar whose inventory folder structure differs from the original, you will need to update each outfit’s path in the Outfit Properties modal to reflect the new folder layout.
Image restore failures
Images are restored after the database transaction commits. If individual images fail to write (for example due to a permissions issue on the server), the database restore still succeeds. The summary shown after restore includes a count of images restored and any errors, so you can see at a glance if images need to be re-uploaded manually.
9.3 RLV Tools
The Tools › RLV submenu provides two utilities for working directly with RLV from the web panel: Check RLV and Send RLV Command.
Both tools require your HUD to be online. They are diagnostic and power-user tools — most users will not need them in everyday use.
Accessing the RLV tools
- Click the hamburger menu (≡).
- Go to Tools › RLV. A submenu appears with Check RLV and Send RLV Command.
- Click either tool to open its modal.
9.4 Tools › RLV › Check RLV
Check RLV asks your HUD to probe whether RLV is currently enabled in your viewer. The HUD sends @version to your viewer and listens for a response for up to three seconds. The result is reported back to the web panel.
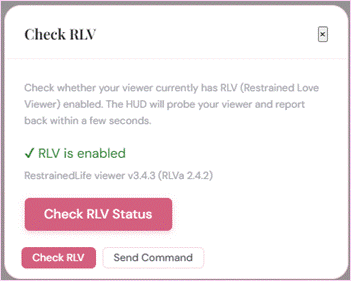
The Check RLV modal showing a result: RLV is enabled, with the RLV version string ‘RestrainedLove viewer v2.x.x’]
The result shows one of two states:
- RLV enabled — your viewer responded to @version. The response string (typically something like “RestrainedLove viewer v2.x.x”) is also shown, confirming both that RLV is active and what version your viewer reports.
- RLV not enabled — your viewer did not respond within three seconds. RLV is either disabled in your viewer settings, or your viewer does not support RLV. Check your viewer preferences (see Chapter 2, Section 2.2).
Check RLV is a real-time probe: it takes up to three seconds to get a result because the HUD must wait for the viewer to respond. The web panel waits up to ten seconds total before reporting a timeout.
Use case: If outfit wearing is not working and you want to confirm that RLV is actually enabled in your viewer, Check RLV gives you a definitive answer without having to look at your viewer settings or interpret viewer output.
9.5 Tools › RLV › Send RLV Command
Send RLV Command lets you type an RLV command directly and send it to your viewer via the HUD. The HUD delivers it with llOwnerSay, exactly as Ensemble does when wearing or removing an outfit.
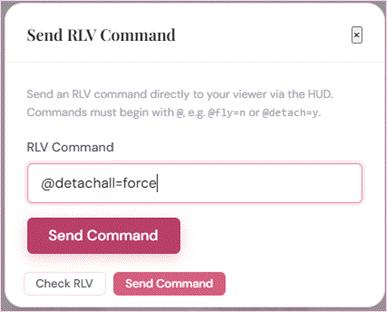
The Send RLV Command modal showing an input field with ‘@detachall=force’ entered and a Send button
To send a command:
- Enter the RLV command in the input field. It must begin with @.
- Click Send.
- A success message confirms the command was delivered to the HUD. Because RLV commands are fire-and-forget, there is no confirmation from the viewer that the command was acted upon.
The command must begin with @ — this is enforced server-side to prevent plain chat messages being sent accidentally. The maximum command length is 256 characters.
Warning: Send RLV Command gives you direct access to RLV. You can issue commands that have significant effects — detaching items, enabling restrictions, locking the HUD. Use it carefully. If you are not familiar with RLV command syntax, do not experiment with this tool on a live avatar.
Example uses
- `@detach:chest=force` — detach whatever is at the Chest attachment point.
- `@detachall:.ensemble/MyOutfit=force` — detach all items from a specific outfit folder (equivalent to Ensemble’s own Remove command for a subfolders-scoped outfit).
- `@version` — probes RLV; the viewer’s response will appear in local chat in-world (not in the web panel).
- `@clear` — clears all active RLV restrictions. Use with caution if you have intentional restrictions active.
The Send RLV Command tool is intentionally minimal — it delivers the command and reports delivery to the HUD. It does not parse, validate (beyond the @ prefix check), or interpret the command. You are responsible for the correctness of what you send.
No response from RLV
RLV commands do not produce a response that Ensemble can intercept. When you send a command, the HUD issues it to the viewer and that is the end of the flow from Ensemble’s perspective. To see the effect, look at your avatar in-world. For commands that produce chat output (such as @version), that output appears in local chat in your viewer, not in the web panel.
This completes Part 2 of the manual. Part 3 covers hosting your own Ensemble installation on nginx or Apache, for those who want to run their own web panel rather than using the hosted instance.