
Chapter 8: Account Window and Settings
This chapter covers all of the settings and account management features available in the Ensemble web panel, and the configurable options in the in-world HUD’s Settings menu. These are the controls you return to occasionally rather than daily — your password, display theme, default removal points, and the HUD’s connection configuration.
The side navigation menu is the entry point for all of these features. Click the hamburger button (≡) in the top-right corner of any web panel page to open it.
8.1 The Side Menu
The side navigation menu contains four top-level sections, each expandable:
- Outfits — Add New outfit (equivalent to using the Create Outfit button on the HUD).
- Tools — RLV tools (Check RLV, Send RLV Command), Create Link, Manage Links.
- Backup — Download Backup, Restore Backup. Covered in Chapter 9.
- Settings — Account, Default Removal Points, Theme Selection, Change Password.
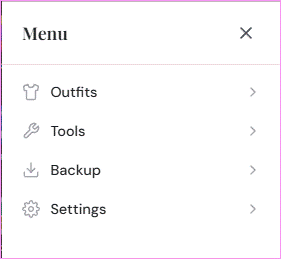
The side navigation menu open, showing the four top-level sections with Settings expanded to show its four items
Click any section heading to expand or collapse it. Click a menu item to open the relevant modal or perform the action. The menu closes automatically when a modal opens.
8.2 Settings › Account
Settings › Account opens the Account modal, which has two sections: Account Details and Currently Worn.
The Account modal showing the Account Details section with fields for Username, Avatar UUID, Region, Simulator URL, Last seen, HUD status, Member since, and HUD scripts
Account Details
The Account Details section shows read-only information about your account and HUD connection:
- Username — your avatar display name as reported by the HUD when it first connected.
- Avatar UUID — your avatar’s unique identifier. This is the value you use to log in to the web panel.
- Region — the name of the region your avatar was in at the last HUD heartbeat.
- Simulator URL — the internal URL the web panel uses to send commands to your HUD. This is set automatically by the HUD and changes if you move to a different simulator. It is shown in a smaller, muted font as it is for diagnostic purposes only.
- Last seen — how long ago the HUD last sent a heartbeat (for example, “2 minutes ago”). If this is very old, your HUD may be offline or detached.
- HUD status — shows whether the HUD itself is locked (🔒 Locked) or unlocked (🔓 Unlocked). This reflects the HUD lock toggled from the in-world HUD menu — not the outfit lock described in Chapter 3.
- Member since — the date your account was first created on this web panel.
- HUD scripts — the version numbers of the Core and WebRelay scripts currently running inside your HUD. Useful when checking whether your HUD is up to date.
Note: None of these fields are editable from this modal. Your username is set from your avatar display name when the HUD first connects. If your display name has changed since then, the username in Ensemble will not update automatically — it reflects the name at the time of first connection.
Currently Worn
The Currently Worn section lets you see what items are currently attached to your avatar, as reported by the HUD. Click the Refresh button to fetch the current list.
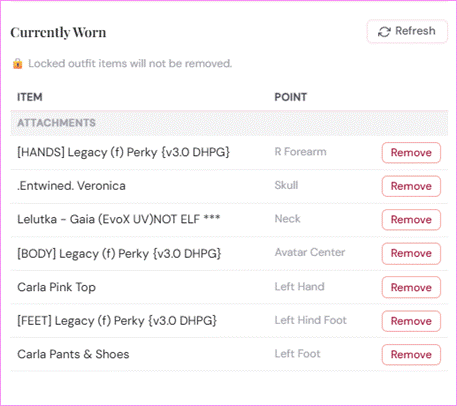
The Currently Worn section of the Account modal showing a table of item names, attachment points, and Remove buttons, grouped into Attachments and HUD Attachments
The table shows each worn item’s name and attachment point. Items are grouped into two categories:
- Attachments — items attached at standard avatar attachment points (body, clothing, accessories).
- HUD Attachments — items attached at HUD positions (Top Left, Top, Top Right, and so on).
Each row has a Remove button that detaches that item via @remattach. Body-layer wearables (clothing layers, not mesh attachments) cannot be removed this way and show a dash (—) instead of a Remove button.
Note: Locked outfit items will not be removed even if you click Remove for them — a note to this effect is shown above the table. The Remove button is shown regardless of lock state, but the HUD will refuse the detach command for any item covered by an active RLV lock.
The Currently Worn list is loaded fresh each time you click Refresh. It does not update automatically.
8.3 Settings › Default Removal Points
Settings › Default Removal Points opens the Default Removal Points modal, covered in full in Chapter 6 (Section 6.4). In brief: this is where you configure the account-wide list of attachment points that are cleared before wearing any outfit that has “Remove Before Wearing” enabled and its scope set to “Use my defaults”.
The checklist is grouped by body region. Tick the points you want cleared, then click Save defaults.
8.4 Settings › Theme Selection
Settings › Theme Selection opens the Theme Selection modal, which lets you switch the visual appearance of the web panel.
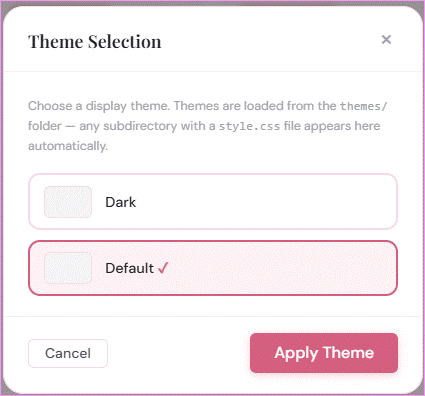
The Theme Selection modal showing two theme options with preview swatches — Default and Dark — with Default currently selected
Ensemble ships with two built-in themes:
- Default — a light theme using rose and periwinkle tones, suitable for most contexts.
- Dark — a dark-background theme using the same colour palette with adjusted contrast.
If the installation has additional community themes installed (by the server administrator), they will also appear in this list. Themes are discovered automatically: any subdirectory of the themes/ folder that contains a style.css file is treated as a valid theme and listed here.
To change theme:
- Open Settings › Theme Selection.
- Click the theme you want. It will be highlighted as selected.
- Click Apply Theme.
The theme is applied immediately without reloading the page — the stylesheet swaps and the dashboard re-renders in the new theme. The selection is saved to your account and persists across sessions and devices.
Note: Theme selection only affects your own web panel view. Visitors to your shared links will always see the default theme. The HUD itself has no visual theme — it is a plain in-world object and is unaffected by this setting.
8.5 Settings › Change Password
Settings › Change Password opens the Change Password modal, where you can update your web panel password at any time.
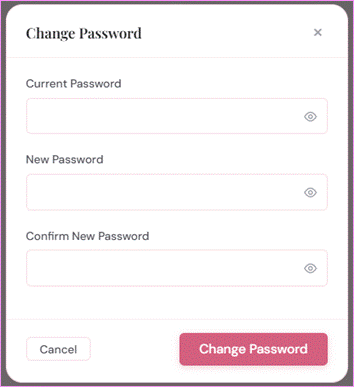
The Change Password modal showing three fields: Current Password, New Password, and Confirm New Password, each with a show/hide toggle button
To change your password, enter your current password, your new password twice, and click Save. Each password field has a show/hide toggle so you can check what you are typing.
Password requirements
New passwords must meet all of the following requirements:
- At least 10 characters long.
- At least one uppercase letter.
- At least one lowercase letter.
- At least one number.
- At least one symbol (e.g. !, @, #, $, %).
Forgotten your password? The Change Password modal requires your current password, so it cannot be used if you have forgotten it. Instead, touch the HUD in-world, open Settings › New Passwd (or Set Passwd if no password has been set), and the HUD will IM you a new temporary password. Log in with the temporary password and then use this modal to set a permanent one.
8.6 The In-World HUD Settings Menu
The HUD also has its own Settings menu, accessible by touching the HUD in-world and choosing Settings. This menu contains options for configuring the HUD’s connection to the web panel. Under normal circumstances you will only need it during initial setup or if something needs to be reset.
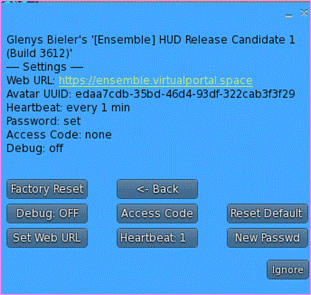
The in-world HUD Settings dialog showing all buttons: Set Web URL, Heartbeat, New Passwd / Set Passwd, Debug ON/OFF, Access Code, Reset Defaults, Factory Reset, and <- Back
The Settings menu shows a summary of the current configuration at the top of the dialog — the current web URL, heartbeat frequency, access code status, and debug mode — so you can see the current state at a glance before making changes.
The menu buttons are:
Set Web URL
Opens a text box where you enter the URL of your Ensemble web panel. This is the base URL of the installation you want the HUD to connect to — for example, https://ensemble.virtualportal.space.
The URL is stored inside the HUD and used for all subsequent heartbeats and command deliveries. If you move to a different web panel (for example, switching from the hosted instance to your own server), update this URL and use New Passwd to generate a fresh temporary password for the new panel.
Heartbeat
Opens a submenu where you can set how often the HUD checks in with the web panel. The options are 1 min, 3 min, and 5 min. The default is 1 minute.
A shorter interval means the web panel sees the HUD as Online more reliably and wear commands are delivered promptly. A longer interval reduces network traffic, which may be preferable on grids where HTTP requests are slow or throttled.
Tip: The 1-minute default is recommended for most users. If you find the HUD is frequently shown as Stale despite being worn, try reducing other network load in your viewer rather than increasing the heartbeat interval.
New Passwd / Set Passwd
Generates a new temporary password and sends it to you by instant message. The button label changes depending on whether a permanent password has already been set:
- Set Passwd — shown when no permanent password has been set yet (your account is new or has been factory reset). Click this after wearing a fresh HUD to receive your first temporary password.
- New Passwd — shown when a permanent password is already in place. Click this if you have forgotten your password, since the web panel’s Change Password modal requires knowing the current one. Log in with the new temporary password and set a permanent one via Settings › Change Password.
Debug ON / Debug OFF
Toggles the HUD’s debug mode. When debug is on, the HUD outputs detailed information about each action in IMs to you — heartbeat responses, RLV commands sent, command delivery status, and so on. This is useful for diagnosing problems.
Debug mode is off by default. Toggle it on when troubleshooting, and off again when you are done to avoid chat clutter.
Access Code
Lets you enter an access code if the web panel you are connecting to requires one. Access codes are a server-side gate: if the server’s config.php has a non-empty ACCESS_CODE constant set, the HUD must send a matching code when checking in or it will be rejected.
The button label shows either “Access Code: set” (if a code is stored) or “Access Code” (if none is stored). The stored code value is never shown — only its presence or absence.
For the hosted instance at https://ensemble.virtualportal.space, no access code is required and you can ignore this button.
Reset Defaults
Resets the HUD’s web URL and heartbeat interval back to their defaults, while leaving your password state and avatar UUID intact. After a Reset Defaults, the HUD will stop communicating with the web panel until you re-enter the web URL via Set Web URL.
Use this if you need to point the HUD at a different web panel while keeping your account on the old panel intact.
Warning: After Reset Defaults, the HUD’s stored web URL is cleared. You must enter the new URL via Set Web URL before the HUD will connect again. Your outfits and account data on the web panel are not affected.
Factory Reset
Wipes all data stored in the HUD: the web URL, heartbeat interval, access code, password state, and stored avatar UUID. The HUD reinitialises as if brand new, releasing any active RLV lock in the process (@detach=y is issued first).
After a factory reset, the HUD will check in with the web panel as a new registration. If your account already exists on the panel (same avatar UUID), the panel recognises you and you will receive a fresh temporary password. Your outfits and settings on the web panel are not deleted.
Warning: Factory Reset should only be used when genuinely needed — for example, if the HUD has been transferred to a new owner, or if the stored settings have become corrupted. It is not required for routine password changes or web URL updates; use the specific options for those instead.
8.7 Signing Out
To sign out of the web panel, click the hamburger menu (≡) and look for your username in the header of the side menu. Ensemble uses a persistent login cookie that keeps you signed in across browser sessions, so you will not be asked to log in again unless you explicitly sign out or clear your browser cookies.
If you share a device with others and do not want your Ensemble session to persist, sign out after each session or use your browser’s private/incognito mode.
The next chapter covers Backup, Restore, and the RLV Tools — the remaining items in the side navigation menu.