
Chapter 5: Base Outfits, Additional Items, and Wear After Remove
Ensemble lets you link outfits together so that pressing a single Wear or Remove button triggers a chain of dressing actions automatically. This chapter covers the three features that make this possible: Base Outfits, Additional Items, and Wear After Remove.
All three are set in the Outfit Properties modal, in the fields below the Access setting. Each field uses an outfit picker — a dropdown search that lets you select from your existing outfits.
5.1 The Wear Sequence
When you click Wear for an outfit, Ensemble does not simply send one command to the HUD. It builds a sequence of outfits and sends them one at a time, in order, with a short pause between each step to give RLV time to process each attachment. The full sequence is:
| Base Outfits (in order) | → | Main Outfit (your outfit) | → | Additional Items (in order) |
- Base Outfits are worn first, in the order you have listed them.
- The main outfit (the one whose Wear button you clicked) is worn next.
- Additional Items are worn last, in the order you have listed them.
Each step in the sequence uses that outfit’s own scope and method settings (see Chapter 4), so a base outfit can use “Replace” while an additional item uses “Add” — and each step’s Before Wearing removal points (Chapter 6) are applied independently.
The pause between steps is 1.5 seconds. This is fixed and cannot be changed. For sequences with many steps, allow a few seconds for the full sequence to complete before checking the result in-world.
Note: If the HUD goes offline part-way through a sequence — for example during a region crossing — the sequence stops at that point. The steps that have already been sent are applied; any remaining steps are not retried. This is by design: a partial sequence is better than unpredictable retries.
5.2 Base Outfits
The Base Outfits field lists outfits that are worn automatically before the main outfit every time you click Wear. Think of them as prerequisites — a body layer, a skin applier outfit, or any other foundation that the main outfit assumes is already on.
The Outfit Properties modal showing the Base Outfits field with one outfit selected as a chip
Adding base outfits
To add a base outfit:
- Open the Outfit Properties modal for the outfit you want to configure.
- Find the Base Outfits row and click + Add. A search dropdown will appear.
- Type part of the outfit name to search, or scroll the list. Click an outfit to add it.
- The selected outfit appears as a chip in the field. Repeat to add more.
- Drag the chips to reorder them if needed, or click the × on a chip to remove it.
- Click Save to store the changes.
You can add multiple base outfits. They are worn in the order they appear in the field — left to right on desktop, top to bottom on mobile.
Typical use cases
- Body layer — a mesh body or skin applier outfit that must go on before clothing. Add it as a base outfit so it is always applied first, even if you forget.
- Underpinnings — a bra, underwear, or layer outfit that goes under the main outfit.
- Reset outfit — a simple outfit that removes a previous look (using Replace mode) before the new one goes on. Useful if you find leftover items from previous outfits.
Example: You have a mesh body outfit (.ensemble/Body/Maitreya) and a main outfit (.ensemble/Dresses/BlueSilk). If you add Body/Maitreya as a base outfit of BlueSilk, clicking Wear on BlueSilk will always apply the body first, then the dress.
Tip: Base outfits are worn using their own saved scope and method settings. If your body outfit uses “Replace”, it will clear relevant attachment points before attaching. If it uses “Add”, it will layer on top. Set each outfit’s own scope and method appropriately.
5.3 Additional Items
The Additional Items field lists outfits that are worn automatically after the main outfit. Use them for accessories, jewellery, shoes, hair, or any other pieces that belong with the outfit but are stored in separate folders.

The Outfit Properties modal showing the Additional Items field with two outfits selected as chips
The interface for additional items works exactly the same way as for base outfits: click + Add, search, select, reorder chips as needed, and save.
Typical use cases
- Shoes — a shoe folder worn after the outfit so it always layers on top correctly.
- Jewellery — earrings, necklace, or bracelet outfits added after the main clothing.
- Hair — a hair attachment outfit that should always be worn with this specific look.
- HUD items — any wearable HUD or accessory that should attach with this outfit.
Example: Your main outfit BlueSilk is a dress. You add Accessories/SilverEarrings and Accessories/SilverNecklace as additional items, in that order. Clicking Wear on BlueSilk will wear the dress, then the earrings, then the necklace.
Tip: Because each additional item is a full outfit with its own scope and method, you have fine control over each one. An earring outfit with “Add” method will attach without removing anything; a shoes outfit with “Replace” might clear the feet attachment points first. Set each independently.
5.4 The Full Sequence in Detail
Putting it all together: when you click Wear on BlueSilk in the example above, with Maitreya as a base outfit and SilverEarrings + SilverNecklace as additional items, the HUD receives four separate wear commands in sequence:
- Wear: .ensemble/Body/Maitreya (base outfit) — 1.5 second pause
- Wear: .ensemble/Dresses/BlueSilk (main outfit) — 1.5 second pause
- Wear: .ensemble/Accessories/SilverEarrings (additional item 1) — 1.5 second pause
- Wear: .ensemble/Accessories/SilverNecklace (additional item 2)
Each command uses that outfit’s own wear mode. The whole sequence takes approximately 4.5 seconds (three 1.5-second gaps) from the moment you click Wear to the final attachment.
Nested sequences
If a base outfit or additional item itself has base outfits or additional items configured, those are included in the sequence too. The full sequence is expanded at wear time — Ensemble resolves all the linked outfits recursively and sends the complete flattened list to the HUD.
This means you can build sequences compositionally: a base outfit that itself depends on another base outfit, and so on. Keep nesting shallow and logical to avoid sequences that are unexpectedly long.
5.5 Wear After Remove
The Wear After Remove field lists outfits that are worn automatically when this outfit is removed via the Remove button in the web panel. It is designed for the common use case of returning to a default or “naked” state after removing a specific look.
| Remove button pressed | → | Outfit removed from avatar | → | Wear After Remove outfits worn |
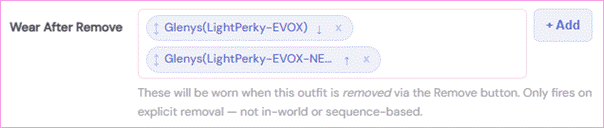
The Outfit Properties modal showing the Wear After Remove field with one outfit selected
The interface works the same way as base outfits and additional items: click + Add, search, select, and save.
When it triggers
Wear After Remove fires only on an explicit Remove action from the web panel — when you click the Remove button on an outfit card, or the Remove button inside the Outfit Properties modal. It does not fire in the following situations:
- When an outfit is removed in-world through your viewer’s inventory.
- When an outfit is removed as part of another outfit’s sequence — for example, if a base outfit uses “Replace” mode, it will implicitly remove items at those attachment points, but this does not trigger Wear After Remove.
- When the Remove button is pressed on a different outfit that happens to share attachment points.
This behaviour is intentional: Wear After Remove is about the explicit removal of one specific outfit, not about any arbitrary detachment event.
Timing and sequencing
After the Remove command is sent and confirmed, Ensemble waits 1.5 seconds and then begins wearing the Wear After Remove outfits in order. Each of those outfits is worn as a full sequence — including its own base outfits and additional items, if any — with the usual 1.5-second gaps between steps.
If the HUD goes offline between the Remove completing and the Wear After Remove outfits being sent, the sequence stops silently. The removal itself will have succeeded; the web panel returns a success response regardless, because the primary action (removing the outfit) completed normally.
Typical use cases
- Return to default — after removing a specific outfit, automatically wear a “base body” or “naked” outfit that restores your default appearance.
- Switch to fallback — when an event or scene outfit is removed, automatically switch to your everyday look.
- Cleanup — after removing an outfit, wear a cleanup outfit (using Replace mode) to clear any leftover attachment points before putting on something else.
Example: You have a formal ball gown outfit. When removed, you want to return to your casual daywear. Add your DayWear outfit to the Wear After Remove field of BallGown. Clicking Remove on BallGown will take off the gown and then automatically wear DayWear.
5.6 Locked Outfits in Sequences
If any outfit in a sequence is locked at the time the sequence runs, it is silently skipped. The sequence continues with the next step as normal. This applies to:
- Base outfits that are locked — they are omitted from the sequence without error.
- Additional items that are locked — same behaviour.
- Wear After Remove outfits that are locked — the locked outfit is skipped; the rest of the Wear After Remove list continues.
The main outfit itself (the one whose Wear or Remove button was clicked) behaves differently: if the main outfit is locked, the entire action is refused with an error. You cannot wear or remove a locked outfit at all; it must be unlocked first. The sequencing skip only applies to linked outfits, not to the outfit being directly acted upon.
Tip: If you find that part of a sequence is not running as expected, check whether any of the outfits in the base or additional items list have been locked. A lock indicator on the outfit card will tell you.
5.7 Building Effective Sequences
A few practical principles for setting up sequences well:
- Keep sequences short. Each step adds 1.5 seconds. A sequence of five steps takes seven seconds. Long sequences feel slow in practice. If a sequence feels unwieldy, consider whether some of the steps can be merged into a single outfit folder.
- Use Replace mode for foundational layers, Add mode for accessories. Base outfits and replacement layers should use Replace to ensure a clean start. Accessories and additions should use Add to avoid disturbing what is already worn.
- Name outfits clearly. Sequence pickers search by title. Clear, consistent names make it much easier to find the right outfit when building sequences across a large wardrobe.
- Test each outfit independently first. Before adding an outfit to a sequence, wear it on its own to confirm it works correctly. Debugging a sequence is harder than debugging a single outfit.
- Avoid circular sequences. Ensemble does not prevent you from adding outfit A as a base of outfit B while outfit B is an additional item of outfit A. Such a loop would expand indefinitely. Keep sequences strictly unidirectional.
Chapter 6 covers the Before Wearing option — the ability to remove specific attachment points before an outfit is worn — which complements the sequencing features in this chapter.